As expected, the drawers have taken up an inordinate amount of time, filler and paint. The drawers themselves were filled a bit, then several coats of paint applied on all sides excluding the bottoms of the Left and Right drawers. The Centre drawer bottom needs to be painted because there is an inexplicable large hole in the base of the house (no idea why) and if the house is hung on the wall, then the Centre drawer bottom will be visible.
The fronts of the drawers get painted black, to show up the trellis fronts.
Meanwhile there was much filling and sanding of the sorry excuses for trellis. Even in the sanding, more bits were breaking off. I rubbed wood filler into the rough edges of the cut outs and into the worst gaps in the veneer, followed by sanding, followed by a first coat of paint to highlight the deficiencies. Then a coat of gesso and more sanding, then some old thick acrylic paint just on the cut out edges to try to smooth them some more. Then multiple coats of white emulsion before they began to look barely acceptable.
I also filled and painted the edges of the house around the drawer boxes because I don't want to add stripwood covering there - the drawers fronts fit snug against the house front.
Feet
The drawer front trellis will hang a little below the bottom edge of the house, so it was time to add the feet to the house to lift it up off the table. Unfortunately the feet pieces in the kit are only about four inches long, which would make an already top-heavy and inclined to tip over house, even more unstable. I discarded those and cut some longer feet from some of the leftover punched out panels, to give more stability. If I do stand this house on a shelf, it will definitely need a safety leash connected to the wall to prevent accidents, like IKEA bookshelves used to come with.
.jpg)
I was working on the porch trellis at the same time. It's important that all the trellis slants in the same direction so I had labelled which pieces were the front layer and which were back pieces. Finally the trellis was in a sufficiently acceptable condition that I could first glue the two layers together, and then glue the trellis to the house. I started with the porch, and then did the three drawer fronts, keeping the trellis level with the top edge of the drawer.
The reason there is still one black drawer front is because, despite my careful labelling, I still managed to glue one trellis with the wrong layer upwards. So it was slanting in the opposite direction. I've broken the offending trellis off the drawer front with a paint scraper and am currently making glue repairs to the resulting breakages.
The final step will be to finish the edges of the trellis fronts and apply a finish paint coat to the bottom of the house. I keep having to remind myself that if the house gets hung on the wall (I still don't know if I will do that) then the underneath of the house will be visible - also the underneath of otherwise hidden roof edges etc.
Starting the fireplace wall kit
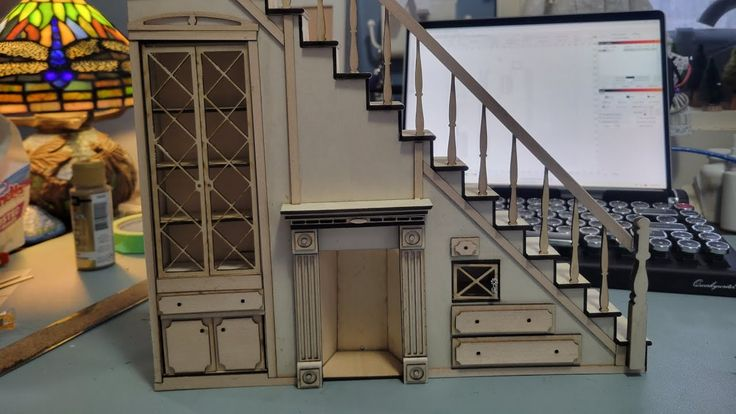
Before I can do anything else to the ground floor, I need to install the fireplace and stair wall. A crude version is supplied with the kit, but I invested in a much more refined custom kit from
Feffie's Cottage in America, which she kindly shipped to the UK for me.
Stock image
This is a lasercut kit which arrives in multiple carefully labelled little plastic bags - so many parts! She has done so much pre-work to help with following her detailed directions. All the cupboards and drawers actually open, so there are a lot of small bits. I want my fireplace wall to be stained to go with my Arts and Crafts look. So I've put each little bag into a receptacle to keep its contents segregated, and I am opening each one in turn to stain the little pieces. I am trying hard not to get things mixed up or to lose anything. I am sanding off some of the soot from the edges but at the same time I don't want to break things, also it is thin plywood so sanding exposes the ply edges more. So my stain job won't make it look like solid wood but hopefully the overall look will be nice. I'm using Rustin's Medium Oak spirit stain.
.jpg)
I am becoming very conscious that it is only a matter of weeks until Christmas, and the displaced houses that I moved upstairs to the dining room, to make room for this build, are cluttering up the decor. DH is always supportive and says it doesn't matter. But to me it will spoil the Christmas look of our dining room. So I might move the houses back downstairs temporarily, in which case they might get in the way of the build a bit.
.jpg)
.jpg)
.jpg)
.jpg)
.jpg)

.jpg)
No comments:
Post a Comment
Thanks for dropping by to comment! Please note that if your Blogger settings are set to 'no reply' then I won't be able to respond.