30 November, 2024

Ground floor decoration, false stair treatment, starting front door

 This week I was installing the ground floor decoration which I purchased so many months ago, and for which I had previously done preparatory painting and staining. The ground floor decoration is basically complete now apart from touching up paint, installing a hearth, and installing the windows and front door.


In the dining room, I installed the cornice and skirting, and then the border and dado wallpapers, then the door moulding. I used a thin door moulding as the door is not full width, part of the illusion of greater depth than is actually available in this cut-down house.


False stair treatment

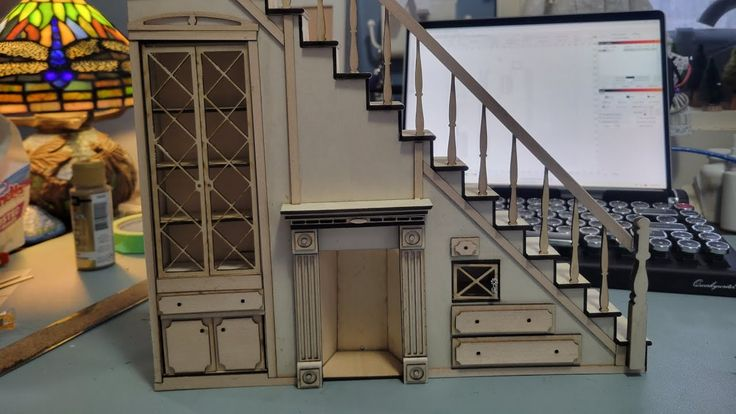
In the living room, I had to decide how to create the illusion that the staircase continues through the ceiling to the first floor (where the faux hallway is).  While I had built the fireplace wall to neatly finish at the ceiling, it needed more to help the illusion look real.  I decided to stop the cornicing short, about where the staircase opening would normally start, and then frame in a simple box which hides the top of the staircase.  I also later installed a bit of angled wallpaper border to suggest that it will follow the staircase angle to the upstairs.


In the living room, I wallpapered the room - managing a neater result on the bay window opening this time (compared to the bedroom) by wrapping a separate strip of wallpaper around the curved portion of the arch to start, then cutting the archway opening wallpaper into an arch shape across the top and the area below the arch so that it wraps around the upright sides and into the bay. I pasted wallpaper between the windows and horizontal strips across the bottom and top of the bay.  Once the window frames are installed, I don't think the seams will show.


I glued in the fireplace wall, prioritising a clean fit against the back wall because any gaps at the base were then hidden with trim.  Then I installed the cornicing, butting it against the fireplace wall on the left, but stopping short on the right as mentioned above.  Then the wallpaper border went on, including along the top of the bay window interior.


Finally I glued on the handrail of the staircase, the trim around the door, and installed the ceiling beams that hide the top of the stairwell.

The illusion when seen face onwards

Looking up at an angle, you can spot the fake

You can see in this picture how shallow the faux staircase really is


Front door

One of the final pieces I will use from the kit sheets is the front door.  There are two pieces: a front trim piece with four cut outs - two for windows and two to simulate panelling - which faces outwards. Mine fits into my door opening, so will appear recessed compared to the exterior door trim.  The other piece is the main door which on mine is a little bigger than the door opening so it will protrude into the interior of the living room.  The interior side will be seen inside, so I stained it.  The exterior side will only show through the openings in the front trim as rear panelling.  I don't want to use the rough kit trim internally so I have stained some wood trim which may actually be cornicing but I think will be ok for a feature door frame.


23 November, 2024

Drawers finished, fireplace wall kit completed, starting ground floor decoration

 The drawers are finally finished, with the repairs completed to the trellis front that I had to break off to reverse the incorrect orientation.


I also gave a couple of final coats of white paint to the underside of the house, the two feet, and the underside of the porch trellis to tidy everything up underneath.


Fireplace wall kit

I spent most of this week putting together the Fireplace Wall Kit from Feffie's Cottage, as mentioned in the last post.  This is a lasercut kit that is custom designed to replace the McKinley's much cruder staircase/fireplace wall.  I found that for whatever reason, my ceiling was  1/4" shorter than the laser kit so I had to cut down the main pieces.  There were also several other pieces that didn't quite fit and needed tweaking but I have fed these back politely to the designer so that she can modify future production runs.  Overall it is quite a detailed kit with lots of drawers and two cupboards and a nicely detailed fireplace.  There is no getting around the fact that it is laser cut from plywood, so there are some sooty edges here and there, and some plywood edges showing.  But overall the effect is fairly good. The original kit, as per the stock image in the last post, comes with lasercut 2D banisters and newel post.  I replaced those with actual 3D banisters, cutting them down to be the same height and to have a little tab protruding at the base to fit into the laser cut hole in each stair step.  I also found a half-thickness newel post in my stash (no idea from where) so I laminated that to the original 2D newel post to add some dimension.  I haven't applied the top and bottom trim or glued in the handrail, I need to wait until the room is decorated and the fireplace wall installed, then I can hide any small gaps with the trim.


Starting ground floor decoration

Now that I know the dimensions of the fireplace wall and where it will go, I've started on the ground floor decoration:  flooring, wallpaper, border, skirting and cornice.  As a first step, I made patterns for the floors in both rooms and then cut those out of parquet effect decorative card.  The floor papers are still loose so I can put them safely away until the wallpapering is done.


17 November, 2024

Drawers, feet, and starting the fireplace wall kit

 As expected, the drawers have taken up an inordinate amount of time, filler and paint.  The drawers themselves were filled a bit, then several coats of paint applied on all sides excluding the bottoms of the Left and Right drawers.  The Centre drawer bottom needs to be painted because there is an inexplicable large hole in the base of the house (no idea why) and if the house is hung on the wall, then the Centre drawer bottom will be visible.


The fronts of the drawers get painted black, to show up the trellis fronts.


Meanwhile there was much filling and sanding of the sorry excuses for trellis.  Even in the sanding, more bits were breaking off.  I rubbed wood filler into the rough edges of the cut outs and into the worst gaps in the veneer, followed by sanding, followed by a first coat of paint to highlight the deficiencies.  Then a coat of gesso and more sanding, then some old thick acrylic paint just on the cut out edges to try to smooth them some more.  Then multiple coats of white emulsion before they began to look barely acceptable.


I also filled and painted the edges of the house around the drawer boxes because I don't want to add stripwood covering there - the drawers fronts fit snug against the house front.

Feet

The drawer front trellis will hang a little below the bottom edge of the house, so it was time to add the feet to the house to lift it up off the table.  Unfortunately the feet pieces in the kit are only about four inches long, which would make an already top-heavy and inclined to tip over house, even more unstable.  I discarded those and cut some longer feet from some of the leftover punched out panels, to give more stability.  If I do stand this house on a shelf, it will definitely need a safety leash connected to the wall to prevent accidents, like IKEA bookshelves used to come with.


I was working on the porch trellis at the same time.  It's important that all the trellis slants in the same direction so I had labelled which pieces were the front layer and which were back pieces.  Finally the trellis was in a sufficiently acceptable condition that I could first glue the two layers together, and then glue the trellis to the house.  I started with the porch, and then did the three drawer fronts, keeping the trellis level with the top edge of the drawer.


The reason there is still one black drawer front is because, despite my careful labelling, I still managed to glue one trellis with the wrong layer upwards.  So it was slanting in the opposite direction.  I've broken the offending trellis off the drawer front with a paint scraper and am currently making glue repairs to the resulting breakages.

The final step will be to finish the edges of the trellis fronts and apply a finish paint coat to the bottom of the house.  I keep having to remind myself that if the house gets hung on the wall (I still don't know if I will do that) then the underneath  of the house will be visible - also the underneath of otherwise hidden roof edges etc.

Starting the fireplace wall kit

Before I can do anything else to the ground floor, I need to install the fireplace and stair wall.  A crude version is supplied with the kit, but I invested in a much more refined custom kit from Feffie's Cottage in America, which she kindly shipped to the UK for me. 
Stock image

This is a lasercut kit which arrives in multiple carefully labelled little plastic bags - so many parts!  She has done so much pre-work to help with following her detailed directions.  All the cupboards and drawers actually open, so there are a lot of small bits.  I want my fireplace wall to be stained to go with my Arts and Crafts look.  So I've put each little bag into a receptacle to keep its contents segregated, and I am opening each one in turn to stain the little pieces.  I am trying hard not to get things mixed up or to lose anything.  I am sanding off some of the soot from the edges but at the same time I don't want to break things, also it is thin plywood so sanding exposes the ply edges more.  So my stain job won't make it look like solid wood but hopefully the overall look will be nice.  I'm using Rustin's Medium Oak spirit stain.


I am becoming very conscious that it is only a matter of weeks until Christmas, and the displaced houses that I moved upstairs to the dining room, to make room for this build, are cluttering up the decor.  DH is always supportive and says it doesn't matter.  But to me it will spoil the Christmas look of our dining room.  So I might move the houses back downstairs temporarily, in which case they might get in the way of the build a bit.  


09 November, 2024

Roof finished at last, attic trim, kitchen bay trim, drawers

 Shingling is done

The shingling is done, praise the sun.  Was really fed up with it by the end.  I finished off the ridgeline with the plastic trim I bought from Hobbycraft, cutting pieces to butt together unobtrusively to achieve the required length.  I had previously sprayed the plastic with matt white primer.  I applied another row or two of shingles to meet at a neat line along the trim and decided to stop there.  In theory there is room to add another partial row of shingles at the very top but that would not have made a neat angle with the trim and would have looked untidy, so I left it.  After cleaning up the various glue threads from the solvent glue, I gave the roofs a spray of protective laquer (masking off the rest of the house obviously), then finally I could glue on the tower roof. I signed my name and the date on the underside of the tower roof for future posterity, if anyone ever does renovations on the house in the future.  I also tidied up where the chimney meets the shingles.


Attic interior trim and beams

With the shingling finally done, I had some renewed energy to get on with a lot of other jobs.  You may notice in the pictures that I have added some ceiling beams to the big attic space, modelling these on online photos of tall rooms with beams.  I kept it simple so that there wouldn't be too many angles to cut.  I've also finished off the internal apex in both gables with trim, and applied trim to the various 'raw edges' where two planes are meeting inside the attic. So the attic interior is almost finished apart from applying the internal tower windows.  I've been holding off on installing the window 'glass' to avoid damage with all the exterior work.  Still to do also is the front gable trim to hide all the raw edges.


Kitchen bay trim

Returning to the lefthand, or rear bay window, I cut out a replacement for the missing central window hood, and painted and installed that.  I also filled and painted up the kit brackets that 'support' the bay and installed those.  And finally, I painted the top of the bay black and added a little metal filigree trim from my scraps box.


Drawers

I knew from reading other build blogs that everyone has trouble getting the under-house storage drawers to fit, so I did a dry fit with masking tape to test them.  The centre one fit fine.  The 'right hand drawer' as labelled in the parts illustration was too big for the right hand opening, but fit fine into the left hand opening.  The remaining 'left hand drawer' was too big for any aperture.  So I cut down the left hand drawer base and back pieces by about 3/8th of an inch to make it fit into the right hand opening, recutting the slots so that the sides will still fit.  I glued the three carcasses together and let them dry.

The drawer fronts need to fit fairly exactly so that the left front is covering over the left wall of the house, and the right front is almost meeting the porch extension, with equidistant gaps between both of them and the centre drawer.  I could glue the centre front on no problem, but because I had swapped the left and right drawers, I had to cut the slots in the fronts longer so that the original fronts could be adjusted to fit into the correct position.  I think I've got it right.  We'll see when the glue dries.

Meanwhile I punched out all the trellis pieces that go on the fronts of the drawers.  This was an awful job, with the splintery plywood shredding, splintering, and outright breaking even though I was pushing the cut-outs from the back and using a knife to help.  I've had to make several repairs with wood glue.  All the openings are rough and horrible, it is going to be a long job to fill them and try to smooth them out. Each drawer has two trellis pieces, with opposite orientation, so that you get a trellis effect when they are stacked (although very thick).  Because it's the same job, I also punched the trellis pieces for the porch base so that I can finish them all together.