So I started this build on 11 June 2024 and I finished it today (apart from the hearth) on 29 December 2024 so it has taken me just over six months of off & on construction. The siding and the shingling were pretty time consuming, so if you weren't doing either of those then it would be quicker.
The last week or so I've been been doing a number of small finishing jobs:
- touching up all the exterior paint where the glue used for the siding had seeped onto boards and was a bit shiny in the light.
- filling in the gaps in the interior window trim with a bit of wood glue applied with a fine tip glue bottle, then painting over that.
- Applying the gable finishing boards to the rear roof edges.
- touching up the paint in various places where I had either spilled over another bit of colour, or perhaps not quite got into a difficult corner.
- fashioning an inner mailbox aperture for the front door (to correspond to the mailbox cover on the exterior)
I built a faux non-functioning bathroom door for the attic and glued it into place. As you can see by the scale figure, this would be an 'old house quirky door', as an adult will have to bend their head to go through. But then there isn't a lot of headroom in the bathroom either, definitely a remodel to squeeze in an ensuite for the master bedroom.
.jpg)
.jpg)
.jpg)
I applied the fancy gable trim to the rear roof edges (purchased from Hobby's, and sprayed with two coats of white primer) and touched it all up with acrylic white paint to blend in.
.jpg)
I used my Brother Scan & Cut to cut out fancy trim from cardstock for the tower under eave area, sealing the cardstock with matt varnish then giving it a light coat of white acrylic paint. I didn't use the crude kit-supplied brackets, but maybe if I find some nice brackets in future, that aren't too big, then I could install them at the corners of the tower sides in between the trim pieces.
.jpg)
.jpg)
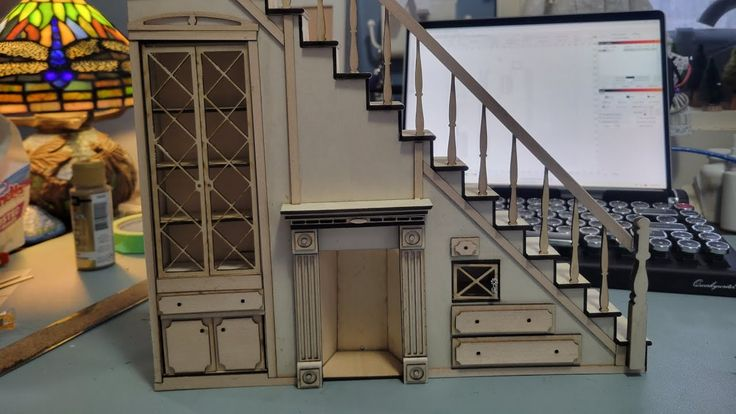
I'm fashioning a hearth for the fireplace and will give it a few coats of satin varnish then install it.
.jpg)
I installed the self-adhesive flock carpet that I bought from Poppets Dolly Bits into the bedroom, which was extremely tricky: as well as trying to get the carpet to stick into all the nooks and crannies without wrinkles, I also had to join two pieces while matching the pattern. It came out pretty well, DH couldn't see the join. I'm a bit nervous about using a self-adhesive product, I've found in the past that adhesive products such as doublesided tape, foam sticky pads etc. do not stand up to the test of time and start letting go after several years, but we'll see.
.jpg)
.jpg)
.jpg)
.jpg)
.jpg)
.jpg)
.jpg)
.jpg)
.jpg)
.jpg)
.jpg)
.jpg)
.jpg)
.jpg)
.jpg)
.jpg)
.jpg)
.jpg)
.jpg)
.jpg)
.jpg)
.jpg)
.jpg)
.jpg)
.jpg)
.jpg)
.jpg)
.jpg)
.jpg)
.jpg)
.jpg)
.jpg)
.jpg)
.jpg)
.jpg)
.jpg)
.jpg)
.jpg)
.jpg)
.jpg)
.jpg)
.jpg)
.jpg)
.jpg)